Hello Gentle Readers of the Sonoran Desert Woodturner!
My social networking advisors tell me I must have Facebook Page, LinkedIn account, Instagram, and every other social networking site known (and some not known) to man (or woman).
Sorry.
I just don't have time.
So I am going to discontinue this blog.
I hope you would like to continue to follow my exploits. If you do, please Like my Facebook Page (https://www.facebook.com/RichardAltenhofen). That's where I'll be blogging.
Thanks for your support!
Richard Altenhofen
Sonoran Desert Craftsman
Monday, February 10, 2014
Monday, June 11, 2012
Garlic Keepers
Storing Garlic
The ideal conditions for storing garlic are a cool, dry place away from direct sunlight. After picking, garlic is often stored and dried hanging from a ceiling.
Unfortunately most kitchens are warm, frequently humid and often sunny. This reduces the
time that garlic will last before sprouting or going soft. Putting garlic in the
fridge is worse than useless and can cause it to go soft and moldy quickly.
For this reason, I like to use a special garlic keeper in which to store the my garlic.

What Is A Garlic Keeper?
The garlic keepers I make have a wooden base and a wooden cover with small vents. My most recent creations have a maple base and a mesquite cover. I added a small knob of acacia on top make it easy to remove the top.
Using a good garlic keeper will maximize the storage life of your garlic, especially if
you
start by buying good garlic in the first place. It should be firm with
plenty of dry papery covering and no sprouting.

Of course, if your cooking's anything like mine your garlic won't need to last very long!
Friday, March 23, 2012
Hello Readers!
In the last two episodes you watched how I created an ballpoint pen. And by now you must be wondering, "Where can I get one of these fabulous pens?"

This pen is an Owen and Fred exclusive. Here's the link:
http://preview.tinyurl.com/82hr2d5
Come back later when I begin a series on fountain pens. "Fountain pens?" you say. "No one uses fountain pens anymore, do they?"
To be continued...
In the last two episodes you watched how I created an ballpoint pen. And by now you must be wondering, "Where can I get one of these fabulous pens?"
This pen is an Owen and Fred exclusive. Here's the link:
http://preview.tinyurl.com/82hr2d5
Come back later when I begin a series on fountain pens. "Fountain pens?" you say. "No one uses fountain pens anymore, do they?"
To be continued...
Sunday, January 29, 2012
Pen Design and Construction - Part 2
Well since there weren't any questions, I can proceed with the completion of these beautiful pens.
Here's a reminder of where we are going with this:
We left off with an array of pen bodies and grips with the brass tube glued in.
The next step is to mount the two pieces on the lathe and turn them down to size. My pen lathe is made by Sherline, which is actually a small metal turning lathe. I found it to be just right size for pen turning and it has the capability of doing making jigs and fixtures for pen making.
The pen parts are mounted on a long mandrel. Using a skew chisel, I first turn the wood into a cylinder and then form the taper on the grip. I sand down to 1000 grit and apply a sanding sealer which fills open pores in the wood and forms a base for the final finish.

The finish I use is a water-clear lacquer that is specially
formulated for musical instruments. It is resistant to hand oils and
abrasion and because it is clear (that is, not yellow as most lacquers
are) it allows the true color of the woods to shine through. My
customers are very pleased with this finish. More than one customer has
shown me a pen that is years old and looks good as new. I have even put
one of my pens through the washer and the dryer (not intentionally!) and
it came out good as new.
Three coats of lacquer is standard. If the sun is out, I put the pen outside to accelerate the cure. Did you know that it takes lacquer about 7 days to fully cure?
The last step is to assemble the pens. The parts are press-fit together in an arbor press. I perform a quick test to make sure the point extends the proper distance and the pens are complete and ready for you!
Here's a reminder of where we are going with this:
 |
| The finished pens |
We left off with an array of pen bodies and grips with the brass tube glued in.
The next step is to mount the two pieces on the lathe and turn them down to size. My pen lathe is made by Sherline, which is actually a small metal turning lathe. I found it to be just right size for pen turning and it has the capability of doing making jigs and fixtures for pen making.
 |
| Blanks mounted on the lathe. |
The pen parts are mounted on a long mandrel. Using a skew chisel, I first turn the wood into a cylinder and then form the taper on the grip. I sand down to 1000 grit and apply a sanding sealer which fills open pores in the wood and forms a base for the final finish.

Here are all the pens ready for the finish.
 |
| Pens turned, sanded and sealed |
 |
| Finish has been applied |
Three coats of lacquer is standard. If the sun is out, I put the pen outside to accelerate the cure. Did you know that it takes lacquer about 7 days to fully cure?
The last step is to assemble the pens. The parts are press-fit together in an arbor press. I perform a quick test to make sure the point extends the proper distance and the pens are complete and ready for you!
Sunday, January 22, 2012
Pen Design and Construction - Part 1
Welcome back to my blog!
People often ask how I make pens so I thought I would share my method with you. This will be in two parts because there's a lot of ground to cover.
The process begins with a design in mind. What I wanted was a design that would appeal to men. And since you can't read my mind, here's a photo of the finished product.
 These pens take a Cross refill and feature a black colored wood grip, a holly (white) centerband, and mesquite burl body. I used Indian rosewood and African blackwood for the black grips. One unique feature of the pen is the wood body extends to the top of the pen and sort of hides the finial. This visually covers the finial, emphasizing the wood body.
First I choose the wood. I have quite a library of pen blanks. The mesquite burl blanks I have cut myself out the cutoffs from larger projects. Here's the parts for a single pen laid out.

From left to right: Holly, African blackwood, and mesquite burl blanks; two brass tubes that form the backbone of the pen; a clip, a transmission that extends and retracts the refill, the tip, and the refill. (Forgot to include the finial in this photo.)
To work!

The first thing I do is cut the top of the blank at a shallow angle on my table saw. Then I create a counterbore to receive the finial. A smaller drill bit is used to drill completely through the blank to receive the brass tube.

While you weren't looking, I counterbored and drilled all of the blanks and cut them to length. I also glued the holly centerband to the grips. I should have glued them to the body. More on that later.

The nest step is to glue the brass tube into the blanks as I have pictured above. The exposed tubes will telescope into the body.
Let's pause here while the glue sets up . Any questions?
People often ask how I make pens so I thought I would share my method with you. This will be in two parts because there's a lot of ground to cover.
The process begins with a design in mind. What I wanted was a design that would appeal to men. And since you can't read my mind, here's a photo of the finished product.

First I choose the wood. I have quite a library of pen blanks. The mesquite burl blanks I have cut myself out the cutoffs from larger projects. Here's the parts for a single pen laid out.

From left to right: Holly, African blackwood, and mesquite burl blanks; two brass tubes that form the backbone of the pen; a clip, a transmission that extends and retracts the refill, the tip, and the refill. (Forgot to include the finial in this photo.)
To work!

The first thing I do is cut the top of the blank at a shallow angle on my table saw. Then I create a counterbore to receive the finial. A smaller drill bit is used to drill completely through the blank to receive the brass tube.

While you weren't looking, I counterbored and drilled all of the blanks and cut them to length. I also glued the holly centerband to the grips. I should have glued them to the body. More on that later.

The nest step is to glue the brass tube into the blanks as I have pictured above. The exposed tubes will telescope into the body.
Let's pause here while the glue sets up . Any questions?
Tuesday, January 10, 2012
And finally, the segmented pens!
It's been awhile since I began my latest series of segmented pens. Whenever you start something new, there are always unforeseen problem to overcome. In this case it was to find a glue that would stick to aluminum and wood. Loctite came through with just what I needed.
And here a few examples of the outcome:

This is a rollerball pen I made from curly maple accented by scallops of red palm.
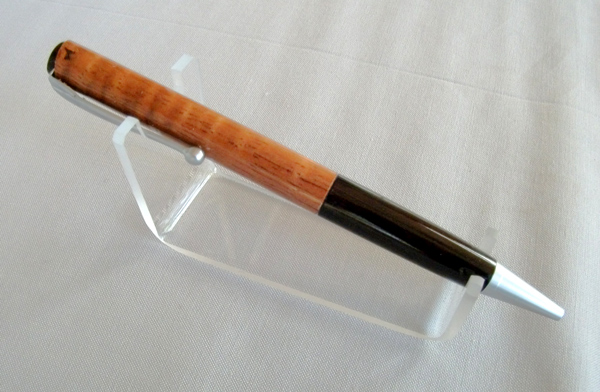
 This is a twist body ballpoint pen I made from curly koa (rare!) and African blackwood. Even the finial is made from wood.
You can see the entire collection in my Etsy store. Check it out!
And here a few examples of the outcome:

This is a rollerball pen I made from curly maple accented by scallops of red palm.
You can see the entire collection in my Etsy store. Check it out!
Friday, January 6, 2012
Mechnical Pencils

While you are waiting to see the segmented pens I am working - you know the ones that required special glue for the aluminum - I thought I would post a photo of s batch of mechanical pencils I recently finished. These are without a doubt, the most demanding writing instruments I create. They require an incredible degree of precision to work correctly.
They use a Pentel mechanism. Long used amongst draftsman and engineers and known for their reliability.
In this group, are a number of colorful woods. From left to right: verawood, desert ironwood, purpleheart, cocobolo, desert ironwood, olive, tulipwood, bocote, and zebrawood. I think I have every continent represented here. Nope. Nothing from Australia.
If any of these interest you, contact me directly.
Back to work!
Subscribe to:
Posts (Atom)